Outlet on Back of Bladed Plug Ge Christmas Tree
TM Pre-Lit Tree
IMPORTANT SAFETY INSTRUCTIONS
75 LED G35 lights with 500 Constant ON mini lights iTwinkle light show
Item Number: 00680
When using electrical products, basic precautions should always be followed
including the following:
READ AND FOLLOW ALL SAFETY
INSTRUCTIONS
• This is an electrical product - not a toy! To avoid the risk of fire, burns, personal
injury and electric shock it should not be played with or placed where small
children can reach it.
• Do not use seasonal products outdoors unless marked suitable for indoor and
outdoor use. When products are used in outdoor applications, connect the
product to a Ground Fault Circuit Interrupting (GFCI) outlet. If one is not
provided contact a qualified electrician for proper installation.
• This seasonal use product is not intended for permanent installation or use.
• Do not mount or place near gas or electric heaters, fireplaces, candles or
other similar sources of he at.
• Do not secure the wiring of the product with staples or nails, or place on sharp
hooks or nails.
• Do not let lamps rest on the supply cord or on any wire.
• Unplug the product when leaving the house, when retiring for the night, or if
left unattende d.
• Do not use this product for other than its intended use.
• Do not hang ornaments or other objects from cord, wire, or light string.
• Do not place lighting string on carpeting, drapes, furniture or allow it to contact
vinyl siding while the power is on.
• Do not perform any maintenance or troubleshoot for bad/broken lamps while
the power is on.
• Do not close doors or windows on the product or extension cord as this may
damage the wire insulation.
• Do not cover the product with cloth, paper or any ma terial not part of the
product when in use.
• This product has a polarized plug (one blade is wider than the other) as a
feature to reduce the risk of electric shock. This plug will fit in a polarized outlet
only one way. If the plug does not fit fully in the outlet, reverse the plug. If it still
does not fit, contact a qualified electrician. Do not use with an extension cord
unless plug can be fully inserted. Do not alter or replace the plug.
• This product is equipped with push-in type lamps. Do not twist lamps
• This product employs overload protection (fuse). A blown fuse indicates an
overload or short-circuit situation. If the fuse blows, unplug the product from
the outlet. Also, unplug any additional strings or products that may be
attached to the product. Replace the fuse as per the User Servicing
instructions (follow product marking for proper fuse rating) and check the
product. If the replacement fuse blows, a short-circuit may be present and the
product should be discarded.
• Read and follow all instructions that are on the product or provided with the
product.
SAVE THESE INSTRUCTIONS
USE AND CARE INSTRUCTIONS
• When the product is placed on a live tree, the tree should be well maintained
and fresh. Do not place on live trees in which the needles are brown or break
off easily. Keep the tree holder filled with water.
USE AND CARE INSTRUCTIONS (Continued)
• If the product is placed on a tree, the tree should be well secured and stable.
• Before using, or reusing, inspect product carefully. Discard any products that
have cut, damaged or frayed wire insulation or cords, cracks in the
lampholders or enclosures, loose connections, or exposed copper wire.
• When storing the product, carefully remove the product from wherever it is
placed, including trees, branches, or bushes, to avoid any undue strain or
stress on the product conductors, connections and wires.
• When not in use, store neatly in a cool, dry location protected from sunlight.
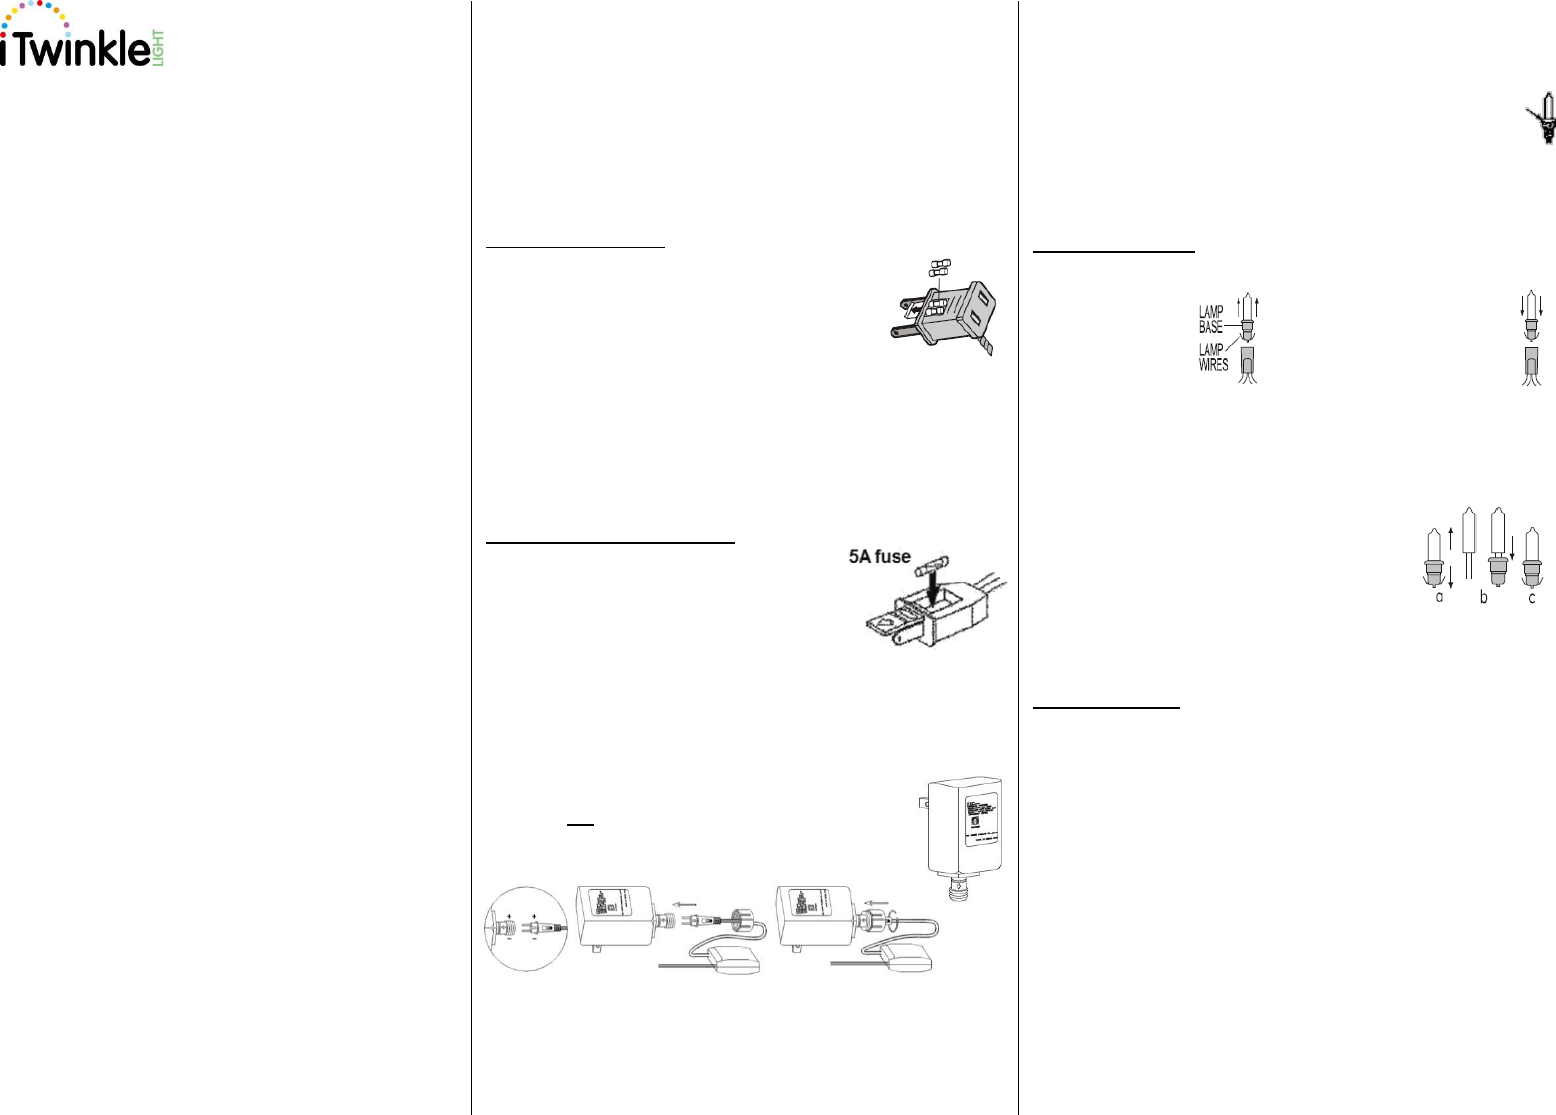
USER SERVICING INSTRUCTIONS
String Fuse Replacement : Most often fuses blow because too many sets
have been strung end-to-end,
a) Before changing fuses, make sure the set is unplugged.
b) Grasp plug and remove from the receptacle or other
outlet device. Do not unplug by pulling on cord.
c) Using a flathead screwdriver, open fuse cover. Slide
open the fuse access cover on top of attachment plug
towards blades.
d) Remove fuses carefully.
e) Risk of fire. Replace fuse only with 3 Amp, 125 Volt fuse (provided with
product).
f) Close fuse cover. Slide closed the fuse access cover on top of attachment
plug. Make sure door is fully closed and fuses are completely covered.
g) Risk of fire. Do not replace attachment plug. Contains a safety device (fuse)
that should not be removed. Discard product if the attachment plug is
damaged.
Control Box Fuse Replacement: Replace the fuse.
a) Grasp the plug and remove from the receptacle or
other outlet device. Do not unplug by pulling on cord.
b) Using a flathead screwdriver, open fuse cover. Slide
open the fuse access cover on top of attachment
plug towards blades.
c) Remove fuses carefully.
d) Risk of fire. Replace fuse only with 5 Amp, 125 Volt
fuse (provided with product).
e) Close fuse cover. Slide closed the fuse access cover on top of attachment
plug. Make sure door is fully closed and fuses are completely covered.
f) Risk of fire. Do not replace attachment plug. Contains a safety device (fuse)
that should not be removed. Discard product if the attachment plug is
damaged.
Install Class 2 Power Supply To String:
NOTE: Use only this GE branded, Class 2 Power Supply,
Model SA3A-050-3000, manufactured by TDC that was provided
with this product. DO NOT use this adapter with any other product.
Fig. 1 Fig. 2 Fig 3
1. Remove the Power Supply from its packing box.
2. The LED string is fitted with a 2-pronged fitting.
3. Align the notch in fitting with the inner tab on end of Power Supply {Fig. 1}
4. Fully insert the fitting into the Power Supply {Fig. 2}
5. Screw the collar completely onto the Power Supply turning clockwise {Fig. 3 }
This string contains two different types of Replaceable
bulbs - steady-illuminating and fuse. REPLACEABLE
FUSED BULBS are identified with white bases. There is one fuse bulb
for each lighted circuit of 50 bulbs. Always replace burned-out bulbs
promptly. If a number of bulbs are burned out, extra
stress is put on the remaining bulbs in the circuit.
This may cause additional bulbs to burn out
prematurely. When a fuse bulb fails the entire circuit
will not light.
Note: G35 LED's are non -replaceable. Tampering with this set voids
the warranty.
Replace Steady Bulb : Before changing bulbs, make sure set is unplugged.
NOTE: Steady and Fuse bulbs are not interchangeable.
a) Grasp plug and
remove from the
receptacle or other
outlet device. Do
not unplug by
pulling cord.
b) Hold bulb by the plastic base
and pull bulb/base straight
out of socket.
c) Replace bulb with only 2.5 Volt,
0.425Watt super bright midget
push-in type lamp provided with
product.
d) Push spare bulb/base assembly
into socket. Do not twist bulb
when inserting into socket. If
bulbs are twisted, part of the set
will not light.
Follow a)-b) above If the spare bulbs provided with the product have
no plastic base or the plastic base does not fit.
Then 1) Remove the old bulb by straightening the
bulb wires and pulling bulb straight from the base.
(Fig. a), 2) Replace the new bulb by straightening
the bulb leads and aiming each wire into a separate
hole in the plastic base ( Fig. b), 3) Make sure each
bulb lead comes out an exit opening at the bottom of the plasti c
base. Now bend each lead up such that each bulb lead fits closely
against the narrow side and in the center of the plastic base ( Fig. c ).
Replace Fuse Bulb:
NOTE: Fuse bulbs are secured in the base with adhesive. Do not
attempt to remove.
Remove old fuse bulb and replace with only 2.5 Volt, 0.425Watt fuse
bulbs provided with product.
CAUTION:
• To reduce the risk of fire and electric shock:
a) Do not install on trees having needles, leaves or branch coverings of metal
or materials which look like metal, and
b) Do not mount or support strings in a manner that can cut or damage wire
insulation.
• To reduce the risk of overheating, replace burned-out lamps promptly. Use
2.5 Volt, 0.425Watt lamps only.
• This Pre-Lit tree is rated 219 Watts (1.825 Amps), do not overload.
• Risk of fire. This product employs overload protection (fuse bulb) in each
series circuit to provide overload protection in addition to the fuse(s) located in
the plug. Do not replace the fuse bulb contained in this set with any other type
of bulb. Use only spare fuse bulbs provided with this product.
REPLACEABLE
FUSED BULBS:
identified with a
white base.
IMPORTANT!
Read Carefully
Keep for future use
7.5 ft. / 2.2 m Pre-Lit Christmas
Tree with Pre-shaped Technology
Allows tree branches to spring into shape
Just assemble and decorate!
With proper use and care, your tree will provide years of use and memories.
Carefully follow the instructions below on how to assemble and disassemble
your tree. If you should have any problems with your tree, or if the tree does
not light after assembly, please refer to the trouble shooting section of this
manual or call our toll free number: 1-877- 398-7337 and a customer service
representative will assist you. Our customer service center is open Monday
through Friday 10:00 AM to 7:00 PM EST with additional hours throughout
the holiday season. You can also visit us on the web at:
www.geholidaylighting.com
Enjoy your holidays!
Before you Begin:
The tree needs to be placed in a clear area, on a flat surface with no
obstructions.
Remove and unwrap all parts. Retain shipping carton for future storage.
Preassembly:
Refer to the iTwinkle TREE™ Assembly Diagram.
Loosen thumbscrew in stand for legs to open and pole to insert.
Place stand where desired as assembled tree is heavy to move.
Disclaimer: DO NOT USE OR INSTALL ANY ADDITIONAL
CHRISTMAS LIGHTING OR ORNAMENTATION THAT IS POWERED
BY A LIGHT BULB SOCKET. DOING THIS MAY RESULT IN
DAMAGE TO YOUR CHRISTMAS TREE OR CAUSE PERSONAL
INJURY. DOING THIS, WILL RESULT IN A VOID OF THE LIMITED
WARRANTY OF THIS PRODUCT.
This device complies with Part 15 of the FCC Rules.
Operation is subject to the following two conditions:
▪ this device may not cause harmful interference, and
▪ this device must accept any interference received, including interference
that may cause undesired operation.
Modifications not approved by the party responsible for compliance could
void user's authority to operate the equipment.
NOTE: This equipment has been tested and found to comply with the limits
for Class B digital device, pursuant to Part 15 of the FCC Rules. These limits
are designed to provide reasonable protection against harmful interference in
a residential installation. This equipment generates, uses and can radiate
radio frequency energy and, if not installed and used in accordance with the
instructions, may cause harmful interference to radio or television reception,
which can be determined by turning the equipment off and on, the user is
encouraged to try to correct the interference by one or more of the following
measures:
* Reorient or relocate the receiving antenna.
* Increase the separation between the equipment and the receiver.
* Connect the equipment into an outlet on a circuit different from that
to which the receiver is connected.
* Consult the dealer or an experienced radio/TV technician for help.
TM
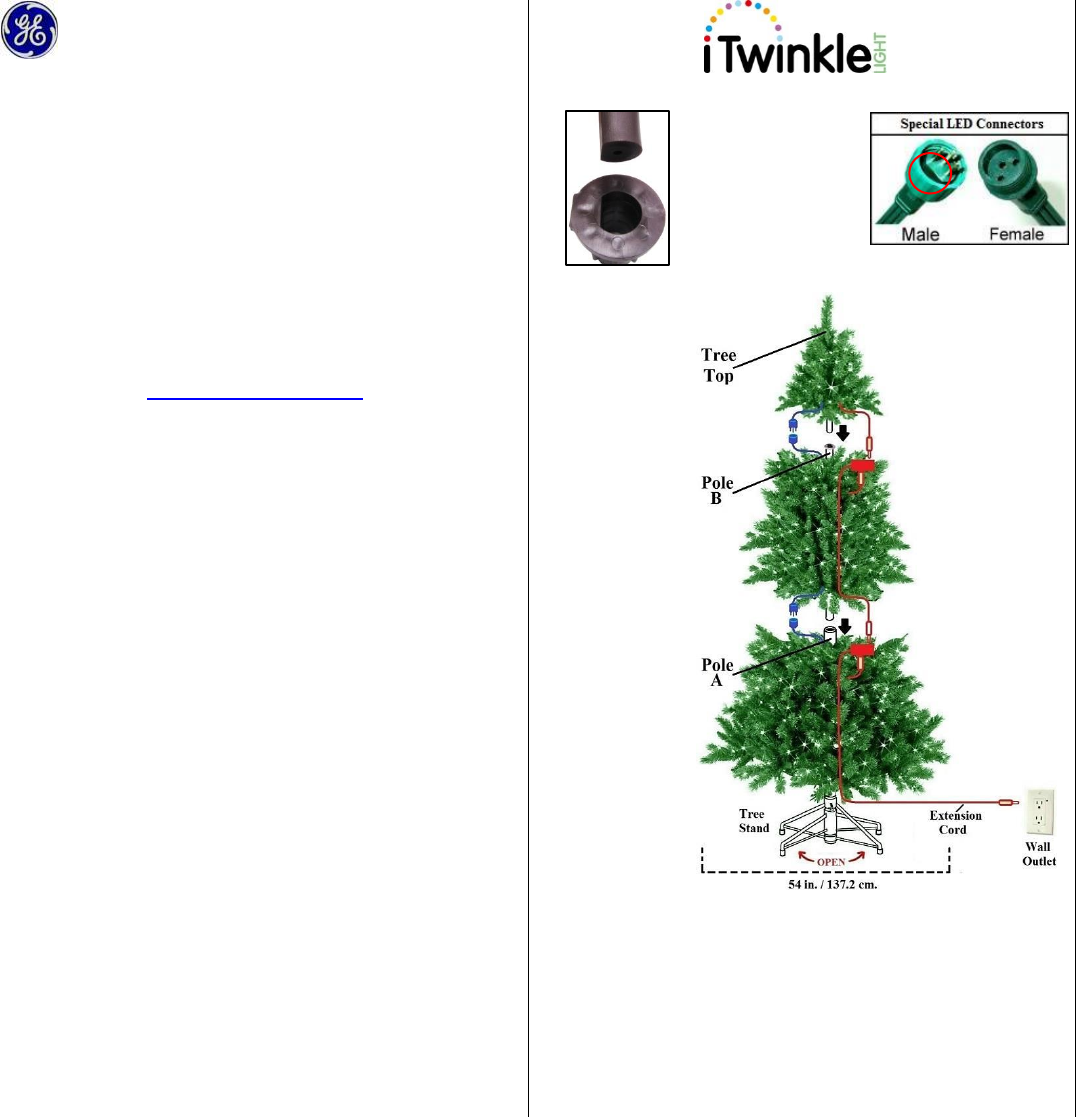
Tree Assembly Diagram
If needed, adjust branch tips to make the tree look fuller.
Congratulations!
Your lighted tree is complete and ready to use with your
selected Apple device.
Trouble shooting Tips:
If tree does not illuminate, the tree may be plugged into a controlled
wall outlet. Make sure the switch is turned ON. If a tree section does
not light, check:
Sections A, B or Treetop: Recheck all the factory and your
assembly connections.
If a portion of a section does not light, check for loose lamps or
missing mini lamps or fuses. Check that the connector on the plug
adapter is fully secured.
Trouble shooting Tips (Continued)
The LED reflectors are not removable.
The LED are not replaceable.
Most Frequently Asked Questions
Q. Can I add a lighted decorative tree top to my tree?
A. Yes, There is an outlet at the back of the bladed plug of the tree
top.
Q. Can I put blinking or flashing bulbs on my tree?
A. No
Q. Can I add extra string sets to my pre-lit tree?
A. No
Q. Can I put my pre-lit tree outside?
A. No. Pre-lit trees are for indoor use only.
Q. Can I hang glass ornaments on a pre-lit tree?
A. Yes, however do not hang directly on the wires of the lights.
Q. Can I remove a light string bulb and add a pig tailed illuminated
or animated ornament or motor?
A. No, removing the bulbs and inserting any additional device into
lamp holder will cause the light set to cease to operate and
may revoke the limited warranty of this product.
Tree Storage:
Remove the plug from the wall outlet. Starting from the treetop, first remove
the plug from the extension cord in section B. Then untwist the securing
cap to pull apart the connectors. Lift the treetop straight up from section B.
Step A: Gently and carefully fold the branches up toward the center
to avoid bulb damage . Place the treetop into your original shipping carton.
Next remove the plug from section B to section A. Set aside after repeating
Step A . Then while holding the tree pole of section A, loosen the thumb
screw located on the tree stand. Remove section A from the tree stand.
Repeat Step A and place into the carton. To close the tree stand for
storage, loosen thumbscrew and push the legs inward. Place tree stand
and section B into the carton. Seal the carton closed.
Important: Store your carton neatly in a cool, dry location protected from
sunlight to prolong the tree life and keep the light sets in working order.
Spare Parts: Your Tree includes a plastic bag containing spare steady and
fuse bulbs, spare 30-amp fuses, as replacements for the lighting strings
and (1) 5-amp fuse.
NOTE: The 5-amp spare fuse is ONLY to replace an open fuse in the
SHORT extension cord WITHIN the tree section. The spare 7 amp fuse for
the LONG extension cord at the BOTTOM of your tree is located within the
plug cavity.
6. Holding the treetop
with one hand gently
pull down the outer
layer of branches. Then
align the treetop post
with the top of Pole B
and insert fully.
(See picture on left)
.
5. Untie the RED
twist-tie to release
the branch panels.
All branches
should fall into
place with a gentle
pull on the outer
layer of branches.
3. Assemble Pole B
into Pole A after first
removing the
protective green cap.
NOTE: On a bottom
branch near the pole is
a special 3-prong male
LED connector. See
insert at top.
2. Untie the RED twist-tie
to release the branch
panels. All branches
should fall into place
with a gentle pull on the
outer layer of branches.
NOTE: On a top
branch near the Pole
is a special 3-holed
female LED
Connector.
See insert at top .
1. Open the tree stand, remove the protective
red cap from Pole A, insert this pole into the
stand and tighten the screw.
NOTE: Remove the white twist-tie around looped cord at
bottom with plug, extend cord and set aside until Step 8.
7 . a) Insert the plug from the
treetop into the unused
outlet on extension cord
of section A.
b) After aligning the 3 prongs
and flat area fully insert
the special LED
connectors together.
Twist cap fully to secure.
4. a) Insert the plug from
extension cord of
section B into the
unused outlet on
extension cord of
section A.
b) After aligning the 3
prongs and flat area
fully insert the special
LED connectors
together. Twist cap
fully to secure.
8. Insert the plug
from the Step 1
NOTE directly
into an electrical
wall outlet to turn
the tree lights on.
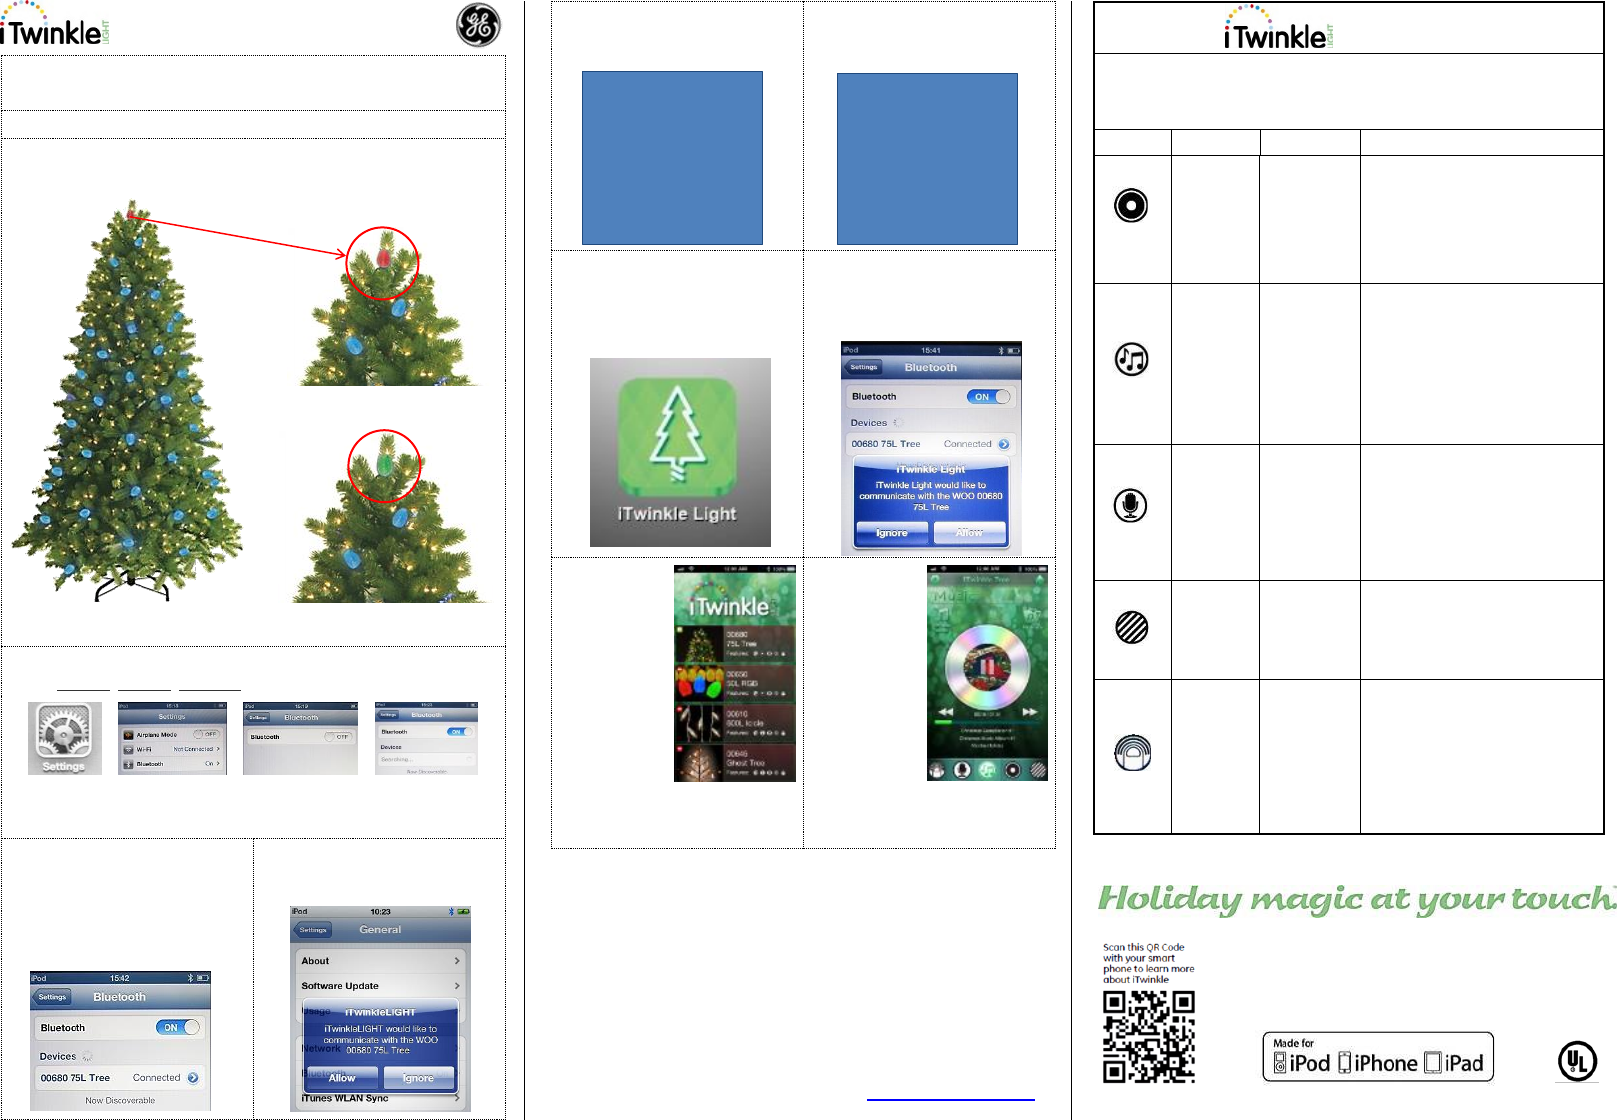
TM Operating Instructions
Just follow these quick and easy steps to set up and use your
new iTwinkleLIGHTTM product.
Fully assemble the tree according to the instructions on the opposite side.
Step 1. Plug in your tree to automatically enable Bluetooth . The top G35
lamp indicates the connection status:
a. Red Color – Connection
available to Apple device.
b. Green Color – Connected to
Apple device.
Note: Blue color shows the product is searching for a Bluetooth device.
Step 2: With your iPad® iPhone® iPod touch®:
Touch Settings, General , Bluetooth, turn ON to search for active devices.
Note: The effective operating range between your device and the string
set is up to 33' (10m).
Step 3. Search your device to find
"00680 75L Tree". Touch it.
Note: To install application your
device must have Internet
capability (If you haven't installed
the App Software).
Step 4. Once connected a window
will appear prompting you to install
the free App software.
Step 5. Touch 'Yes' to install.
Once installed this window will not
appear again.
Step 6. The free iTwinkleLight
App appears. Touch Free and
then touch Install App
Step 7. Once installed the
iTwinkleLight icon will appear on
your screen. Find it. Touch it to
launch program.
Step 8. If this screen appears your
Bluetooth device is available.
Touch Allow to connect or Ignore
to search for other devices.
Step 9. The
iTwinkleLight
Main Menu
appears with 4
items per
screen. Scroll
to select your
item.
Note:
A green circle
shows your
Apple device is connected to your
product. A red dash shows your
product is not connected.
Step 10. Product
features screen
will now appear.
Touch any icon
at the bottom of
the screen to
activate that
feature.
"Made for iPod," "Made for iPhone," and "Made for iPad" mean that an
electronic accessory has been designed to connect specifically to iPod, iPhone,
or iPad, respectively, and has been certified by the developer to meet Apple
performance standards. Apple is not responsible for the operation of this device
or its compliance with safety and regulatory standards. Please note that the use
of this accessory with iPod, iPhone, or iPad may affect wireless performance.
©2013 Nicolas Holiday Inc.,
9F., No. 37, Guangfu N. Rd
Taipei, Taiwan 10560
All rights reserved
For Indoor Use Only 120 V 60 Hz
This is not a toy, for decorative use only.
To view these instructions online please visit us at www.geholidaylighting.com
or call customer support toll free at 1- 877-398-7337
Note: Touch the house icon in the upper right corner
to return to the iTwinkleLight Main Menu
Touch the circle to change
colors.
Slide to adjust brightness.
Choose from over 2000
colors.
Touch iTwinkle Music to
enjoy 1 of 8 pre-loaded
songs and light shows.
Touch My Music to select
songs from your iTunes
music library and play songs
from any country.
Speak… the LED lights flash
to your voice.
Select an icon to hear your
message replayed in a child-
like or Santa voice.
Scroll icons to select 1 of 8
programmed light shows.
Note: This pattern is used for
the myColor feature.
Tap to change color of lights.
Hold the device securely;
SHAKE wrist to change
colors.
PRINTED IN CHINA FP13
Outlet on Back of Bladed Plug Ge Christmas Tree
Source: https://usermanual.wiki/H-S-CRAFT/HSNHI.User-Manual-2-pdf/html
0 Response to "Outlet on Back of Bladed Plug Ge Christmas Tree"
Enregistrer un commentaire